
You can make parking lots safer by putting in rubber speed bumps. Picking the right place and using good materials is important. A rubber speed bump makes cars go slower. It helps keep people walking safe. Around 30% of shopping and work parking lots in the U.S. have rubber speed bumps.
- Speed bumps make cars slow down, which keeps people safe.
- They lower the chance of crashes in busy places.
- Slower cars give drivers more time to stop and avoid accidents.
- Speed bumps help make places safer where it is hard to see or turn.
Doing each step carefully helps make the installation safe and work well.
Key Takeaways
- Rubber speed bumps help keep people safe. They slow down cars. This lowers the chance of accidents in busy places.
- Getting ready is very important. Clean the spot where you will install. Mark where the speed bump will go. This makes sure it works well.
- Use the correct tools and supplies. Use spikes for asphalt. Use bolts for concrete. This keeps the speed bumps in place.
- Check and fix speed bumps often. Clean them and repaint them. This helps them last longer and stay safe.
- Safety comes first. Wear safety gear. Mark the work area. This lets people know what is happening.
Tools and Materials for Rubber Speed Bump Installation
Essential Tools
You need certain tools to install rubber speed bumps safely. Make sure you have these tools before you begin:
- Use a hammer drill to make holes in concrete or asphalt.
- Use a sledgehammer to drive spikes or bolts into the ground.
- You need both a regular hammer and a small sledgehammer.
- Use a drill to make pilot holes for screws.
- Get four lag screws that fit your speed bump.
- Steel spikes are best for asphalt surfaces.
- Use bolts and shields if you are working on concrete.
- Put traffic cones around your work area to keep people safe.
Tip: Put traffic cones around your work zone. This warns drivers and helps keep everyone safe.
Required Materials
You need special materials to finish the job. The main thing you need is the rubber speed bump. Pick the right mounting hardware for your parking lot surface. Here is a table that shows common materials and their average prices:
| Material Type | Cost |
|---|---|
| Rubber Speed Bump with Concrete Mounting Hardware | $532.00 |
| Rubber Speed Bump with Asphalt Mounting Hardware | $536.00 |
You might need activated epoxy resin for extra strength. It is not always needed. Most rubber speed bumps have reflective strips. These help drivers see them at night. Installation costs can be from $1,000 to $10,900. The price depends on the type and size of the speed bump. A four-segment speed bump costs about $300. Full installation with permits and striping can cost up to $5,800.
Note: Rubber speed bumps are easy to install. They are light and come with all the hardware you need.
Rubber speed bumps are better than concrete or metal ones. They last longer and need less fixing. Rubber absorbs impact, so it does not crack or break like concrete. Choosing rubber helps the environment. Many speed bumps use recycled materials. Reflective strips and bright colors make them easy to see. You save money over time. Rubber speed bumps need less fixing and stay strong after many cars drive over them.
Preparation for Installing Rubber Speed Bumps
Selecting Location
You should pick the best spot before installing rubber speed bumps in parking lots. Use these steps to help you choose:
- Check how many cars drive through the area each day.
- Look at the road layout and see where cars turn or enter.
- Watch where people walk most often.
- Find places where safety is a concern, like near crosswalks or sharp turns.
- Place speed bumps close to entrances, pedestrian crossings, or areas with limited visibility.
Speed bumps work best when you put them near busy walkways and places where drivers need to slow down. This helps protect people and lowers the chance of accidents.
Tip: Always check local rules before you install speed bumps. Some places have laws about where you can put them and how big they should be. You may need signs to warn drivers.
Positioning and Marking
After you pick the location, you need to mark the pavement. Good marking helps you place the speed bump straight and in the right spot.
- Sweep the area to remove dust and debris.
- Use chalk to draw center lines both parallel and perpendicular to the street.
- Mark the border lines so you know where the edges of the speed bump will go.
Placing speed bumps near crosswalks and busy walkways helps control traffic flow. Drivers slow down, which keeps people safe. Lower speeds mean fewer serious injuries if an accident happens.
Surface Cleaning
Clean the surface well before you start. A clean area helps the speed bump stick and last longer.
- Remove all dirt, debris, and oil from the pavement.
- Use a power washer or a stiff bristle brush for tough spots.
- Make sure the surface is dry before you begin.
Weather can affect how well the speed bump lasts. Sunlight can make rubber fade or crack. Rain and snow can also damage the material. If you live in a place with extreme weather, pick materials that resist cracking and have good drainage.
Note: Following these steps helps you prepare the area for installing rubber speed bumps. Good preparation makes the installation safer and helps the speed bump last longer in parking lots.
Steps for Installing Rubber Speed Bumps
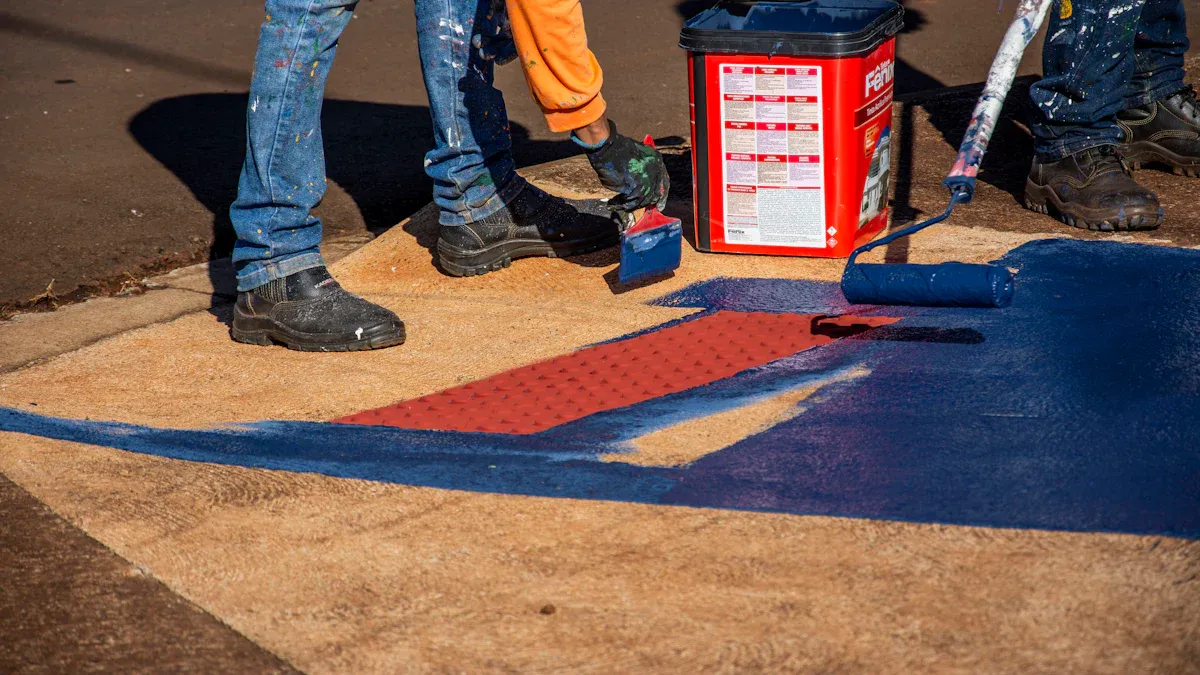
Installing rubber speed bumps in parking lots helps control traffic and keeps people safe. You need to follow each step carefully to make sure the speed bump stays secure and works well. Here are the steps for installing rubber speed bumps.
Drilling Pilot Holes
Drilling pilot holes is the first step in the process. You need to make sure the holes are deep and clean for a strong hold. Follow these steps for installing rubber speed bumps:
- Gather all your tools and materials. You need spikes or bolts, shields, a drill, and a hammer.
- Place the rubber speed bump at the spot you marked earlier.
- Use the drill to make holes through the top of the speed bump. Pick the right drill bit size for your hardware.
- Remove the speed bump and drill the holes again to make them deeper. Clear out any dust or debris from the holes.
- If you use bolts and shields, hammer the lead shields into the holes before you put the speed bump back.
- Put the speed bump back in place. Hammer the spikes or tighten the bolts into the shields.
Tip: Always double-check the depth of each hole. Deep holes help the speed bump stay in place after many cars drive over it.
Securing with Bolts and Washers
You need to use the right bolts and washers to keep the rubber speed bump secure. The type of hardware depends on the surface in your parking lot.
- For concrete surfaces, drill a hole and clean out any debris. Insert the shield and tap it until it is flush with the surface. Place the speed bump over the shield and insert the lag bolt.
- Use 4 1/2″ anchors for concrete. These anchors do not work for asphalt.
- For asphalt, use rebar spikes instead of anchors.
- Insert bolts and steel washers into the holes. Tighten each bolt and washer so the speed bump does not move.
Note: Tightening all bolts and washers keeps the speed bump from shifting. Loose hardware can cause damage or make the speed bump unsafe.
Final Placement
You need to make sure the final placement is level and secure. This step helps the rubber speed bump last longer in parking lots.
- Clean the area again to remove any leftover debris. Make sure the surface is dry.
- Lay a base layer if needed. Excavate the marked area to a depth of six inches. Level the surface and compact a layer of crushed stone or gravel. This creates a solid foundation.
- Place the rubber speed bump on the prepared surface. Check that it sits flat and does not wobble.
- Inspect each bolt and washer. Tighten them again if needed.
- Look at the speed bump from different angles. Make sure it is straight and lines up with your markings.
Callout: A level and secure speed bump helps slow down cars and protects people walking in parking lots. You improve safety and reduce the risk of accidents.
By following these steps for installing rubber speed bumps, you make sure the installation is stable and safe. Careful work at each stage helps the speed bump last longer and keeps your parking lot safe for everyone.
Rubber Speed Bump Safety Precautions
When you work on installing rubber speed bumps, you must keep safety in mind. You protect yourself and others by following simple rules. Good safety habits help you finish the job without accidents or injuries.
Personal Protective Equipment
You need to wear the right gear before you start. Personal protective equipment (PPE) keeps you safe from dust, sharp tools, and heavy objects. Here is a list of what you should wear:
- Safety glasses protect your eyes from flying debris.
- Work gloves keep your hands safe from cuts and scrapes.
- A hard hat shields your head from falling objects.
- Steel-toed boots protect your feet from heavy tools or materials.
- Ear protection helps if you use loud power tools.
Tip: Always check your gear before you begin. Replace anything that looks worn or damaged.
Wearing PPE makes a big difference. You lower your risk of injury and stay comfortable while you work.
Site Safety
You also need to keep the work area safe for everyone. People may walk or drive near your site. You must warn them and keep them away from danger.
- Place traffic cones or safety barriers around the work zone.
- Use bright signs to tell drivers and pedestrians about the work.
- Keep tools and materials organized so no one trips or falls.
- Clean up spills right away to prevent slips.
- Never leave tools or hardware on the ground when you finish.
Callout: Always have a first aid kit nearby. Quick action helps if someone gets hurt.
You make the parking lot safer for everyone by following these steps. Good safety habits help you install a rubber speed bump without problems. When you focus on safety, you protect yourself and others during every step of installing rubber speed bumps.
Post-Installation Tips for Rubber Speed Bumps
Inspection and Adjustment
You need to inspect your rubber speed bump after installation to keep it working well. Start by looking for any cracks or breaks. Check if the speed bump sits flat on the ground. Measure the height and width to make sure it matches safety rules. Clean off leaves, dirt, or small rocks that might block the speed bump or make it hard to see. Write down each inspection in a log so you can track repairs and changes over time.
Recommended Inspection Steps:
- Look for visible damage or wear.
- Measure the speed bump’s height and width.
- Record inspections and repairs in a log.
- Check for cracks or breaks and fix them quickly.
- Remove debris to keep the speed bump clear.
Tip: Inspect your speed bump at least twice a year if your parking lot gets a lot of traffic. Regular checks help you spot problems early.
Common issues include cracks, faded paint, and debris buildup. If you find any problems, fix them right away. Adjust the speed bump if it moves out of place. Keeping the area clean and safe helps drivers and pedestrians.
Maintenance Advice
You can make your rubber speed bump last longer with simple maintenance. Clean the surface often to remove dirt and leaves. Repaint faded stripes so drivers can see the speed bump, especially at night. Seal small cracks before they get bigger. Patch any major damage as soon as you notice it. Make sure bolts and washers stay tight.
Maintenance Checklist:
- Inspect for wear, damage, or movement.
- Clean off debris and plants.
- Repaint stripes for better visibility.
- Seal cracks and patch damage.
- Check hardware and tighten bolts.
Callout: Set up a regular maintenance plan. This keeps your speed bump safe and working for years.
A good maintenance routine helps you avoid costly repairs. You protect people and cars in your parking lot by keeping your speed bump in top shape.
You can install rubber speed bumps in parking lots by following these steps:
- Gather all tools and materials.
- Position the speed bump.
- Drill and clean holes.
- Insert shields if needed.
- Secure with spikes or bolts.
Proper preparation keeps emergency routes clear and makes speed bumps visible. Always use signs to warn drivers. Regular inspections help you spot cracks or loose bolts early. Rubber speed bumps last longer and need less fixing than concrete.
Tip: Set up a quarterly inspection schedule to keep your parking lot safe and your speed bumps working well.
FAQ
How long does it take to install a rubber speed bump?
You can install a rubber speed bump in about one hour. The time depends on the size of the bump and the number of workers. You finish faster if you prepare the area and gather all tools before starting.
Can you install rubber speed bumps on any surface?
You can install rubber speed bumps on asphalt or concrete. Make sure the surface is clean and dry. Use the right hardware for each surface. Asphalt needs spikes. Concrete needs bolts and shields.
Do rubber speed bumps need special maintenance?
Rubber speed bumps need simple care. Clean them often and check for loose bolts. Repaint faded stripes so drivers see them. Fix cracks quickly to keep the bump safe.
Tip: Inspect your speed bump every few months to catch problems early.
Are rubber speed bumps safe for emergency vehicles?
Rubber speed bumps slow all vehicles, including emergency ones. You can place speed bumps in areas that do not block emergency routes. Always follow local rules for placement.
What is the average lifespan of a rubber speed bump?
A rubber speed bump lasts five to ten years. The lifespan depends on traffic and weather. You extend its life with regular cleaning and quick repairs.


